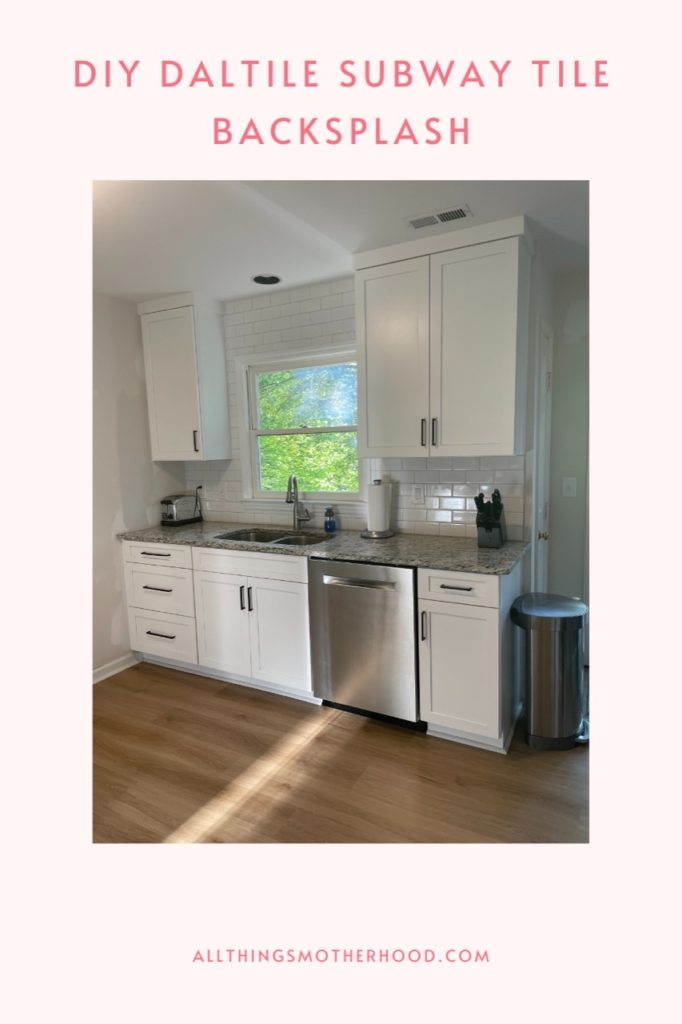
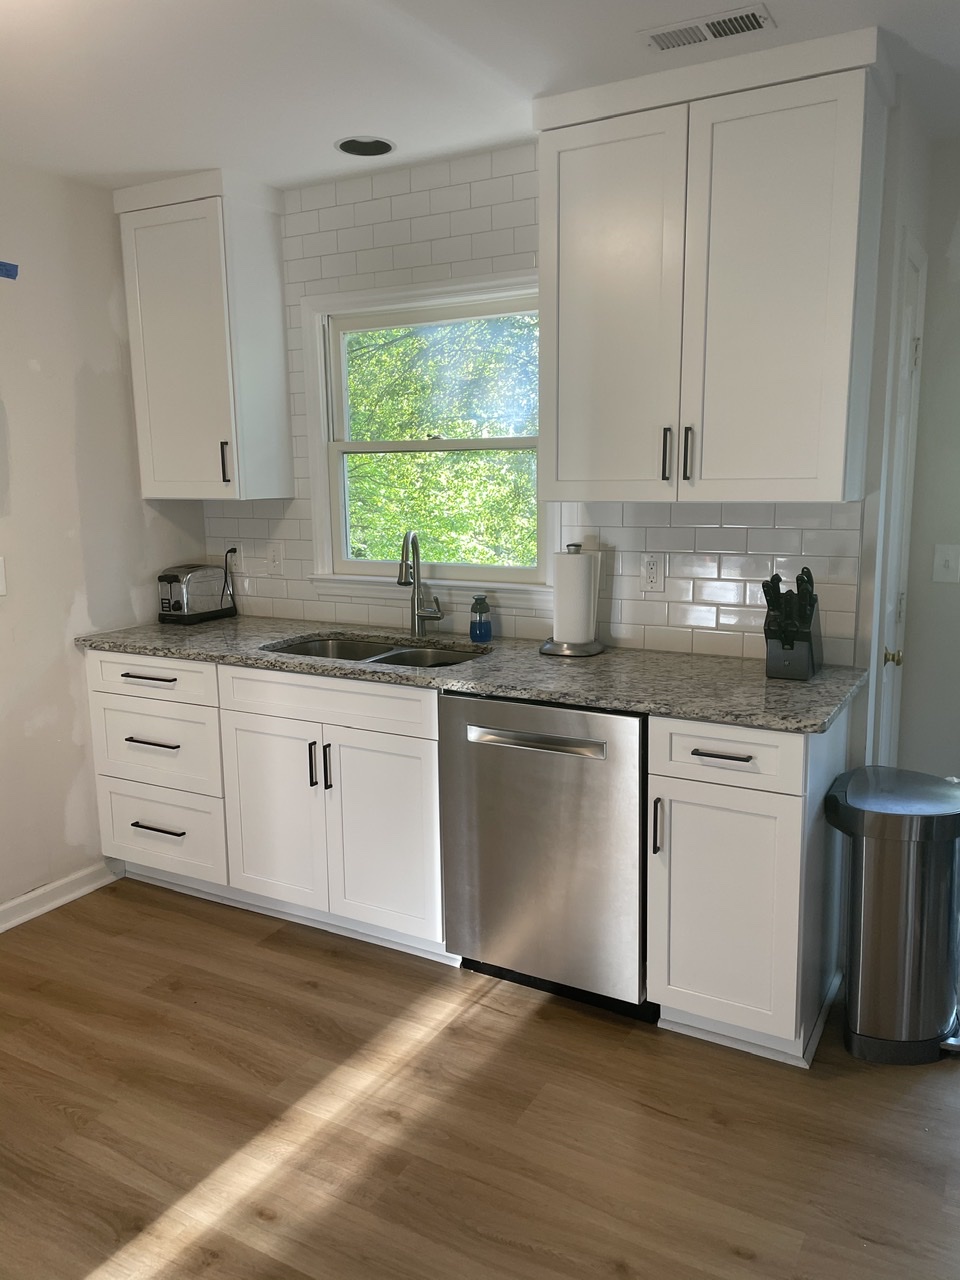
When the leak happened and we renovated our kitchen we decided to ditch the 4 inch granite backsplash for subway tile. We chose to go with Daltile Subway tile from Home Depot because it looks great and is affordable.It’s the regular 3×6 size and comes in at about $1.20sq ft.
The Prep Work
The first thing we did was measure out how much square feet our backsplash was. Then purchased the tile according to the calculator on Home Depot’s website. It calculates in for waste/mistakes. Our Kitchen is about 25sq ft.
Custom Metal Edging
We decided on using a metal edging piece for two edges in the kitchen where the tile would end at an open wall. You select the type of profile based on where the tile is being laid as well as how thick the tile is. The Daltile is 5/16 inch thick. Here is the Schluter trim that fits it and here is the Custom trim. We went with Custom because Lowes only carried one color of the Schluter trim size we needed and it was going to take too longer to order it in. Plus, the Custom was cheaper.
We were not prepared for how to cut this trim. We don’t own every power tool on the planet and after reading the instructions, my husband had to make a trip to the store for a hacksaw and aluminum file.
Decide Where you Want the Tile to End
We looked at many, many photos of backsplashes and people do it all sorts of ways. Some go all the way to the edge of the counter some go along the back wall and sides of the counter area etc. We decided to only tile the back wall, and to stop the tile at the edge of the cabinet. This would make it easier for cuts and for the metal trim edging.
Check Counter Levels
Then we checked our counters to make sure they were level. Our longest section where the sink is was level. However, the two cabinets on either side of the range were slightly off. If we started on the left side and went level across it would just barely hit the granite on the other side instead of sitting on top with a bit of space.
We decided to start a row above and used a PVC Custom edging for a ledger to rest the tiles on. We used a level and nails to install it. After moving up from that row, we came back, removed the ledger and completed the first row underneath that and my husband had to shave off a tiny bit of the tile on the right side to accommodate for the slightly higher counter.
Getting Started
Here are the products needed:
–Daltile Subway Tile
– 5/16 Custom Metal Edge or bullnose tile
– Hacksaw (to cut metal edging)
–Aluminum File (to file down metal edging)
–Tile cutter
– Tile Sanding Stone
-Wet saw
–Mortar
–Grout (we used two in warm gray)
– Grout colored Caulk
– 1/4 trowel
– Flat trowel (easier to scoop mortar out with)
–Grout float (and a thin one for between window and cabinets)
–Sponges/bucket
-Utility Knife
We owned many of these tools prior to starting and borrowed the wet saw and tile cutter from a friend which helped to keep costs down significantly.
Tiling the Backsplash
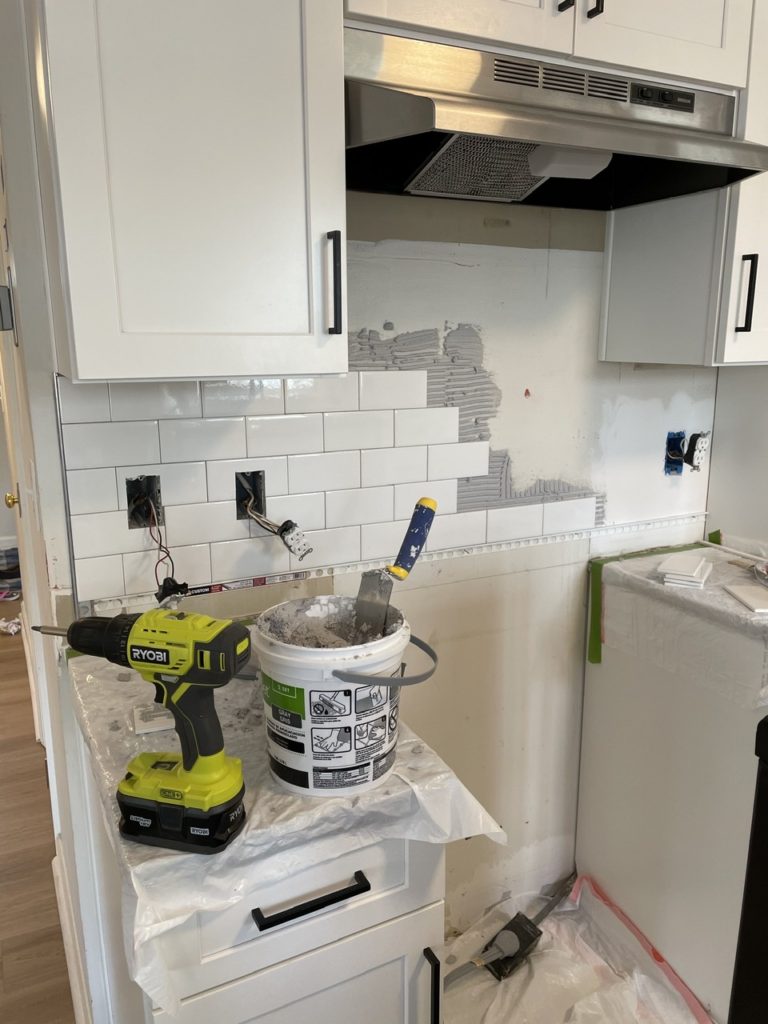
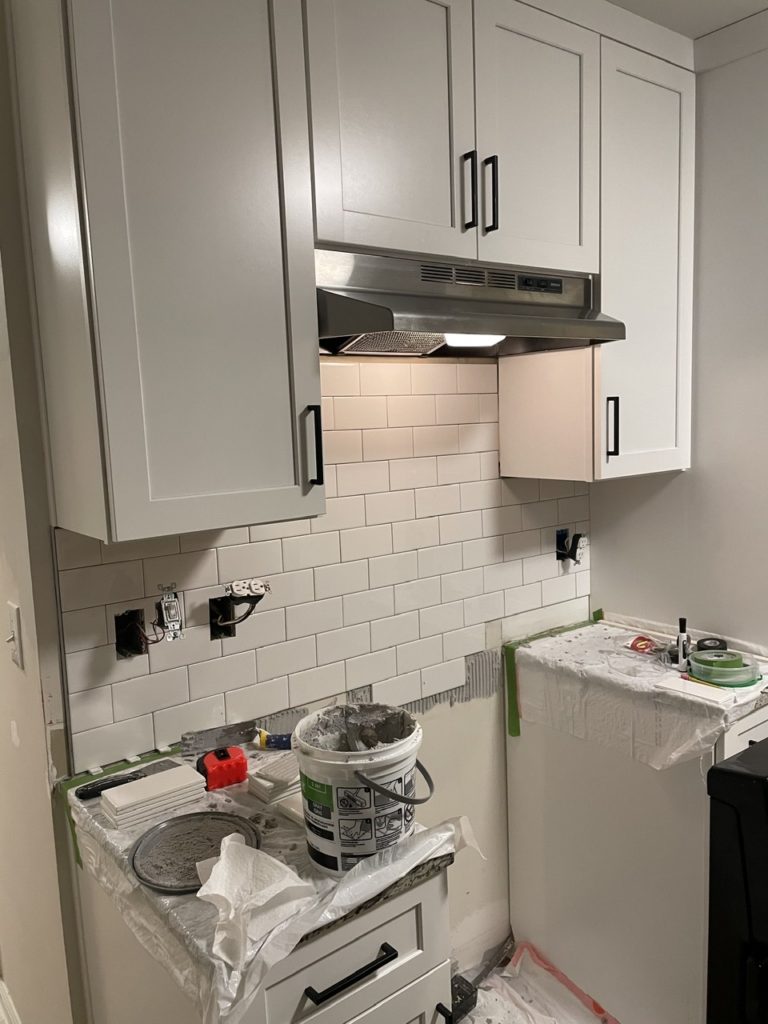
First we shut off the power to the kitchen outlets and pulled out all of the wall outlets. When you tile you need to make cuts around them and it’s easier if the outlets are out of the way completely.
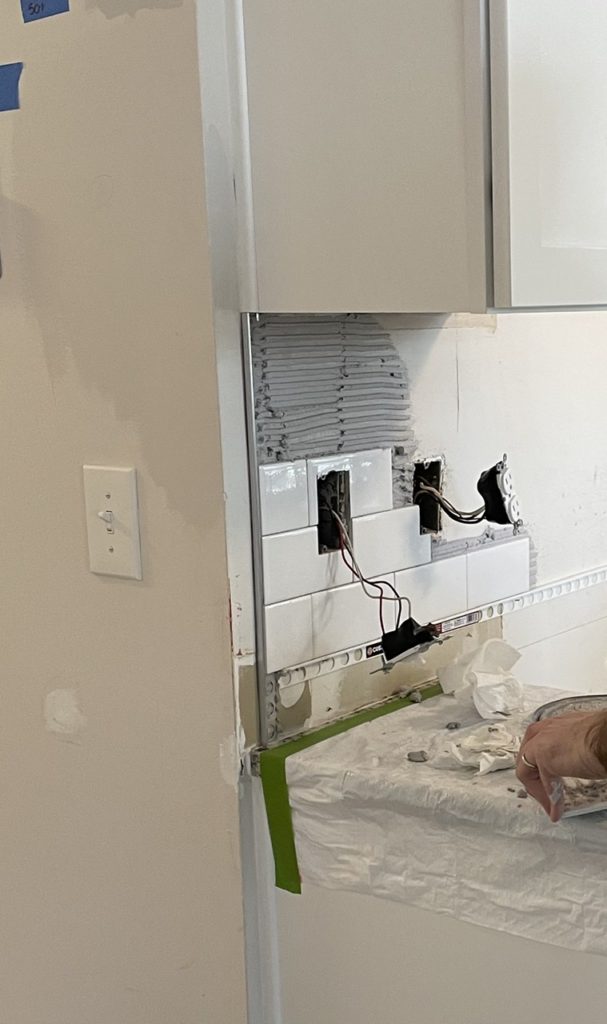
We chose to make things easy and purchased pre-mixed mortar. We used our 1/4 trowel and applied it onto the wall at a 45 degree angle and placed our Custom edge trim firmly into it by using a level. Then we started our first row of tiles. Since we were starting on the second row up we had to start with a half of a tile. We used a tile scorer for some of the easier larger cuts, but it was definitely necessary for us to use a wet saw for many of the intricate cuts. We watched this video for how to cut the tile.
Spacers
These Daltile subway tiles come with a slight edge around to create a 1/16 of a grout joint without adding additional spacers. We wanted this size, so it made for quicker and easier tiling. When you cut a tile in half you do lose the built-in spacer but there is still space between because the next tile will still have its spacer. The difference in grout joint size is barely noticeable.
Continue working across your row. We chose to back butter (putting mortar on the back of the tile) for some areas around the outlets and other harder to reach areas. And then move up each row until you’re done!
We waited until we finished up to the top of the vent hood to remove the ledger we created to do the last row. We used 1/8 inch spacers for between the counter and the tile because we wanted to be sure there would be enough flex and space for expansion. Our house tends to expand and contract a fair amount during the seasonal changes. Looking back, we probably could’ve just used 1/16th and it would’ve been sufficient.
Window Cuts
For the sink side of the kitchen with the window, we decided to remove the trim below the window ledge to get the cleanest finish. Our trim would make it really hard to cut tile around and make it look good so this worked great!
We carefully removed it and then just tiled behind with a half tile and then put the trim back on after we were finished.
My husband traced on paper the cut around the edge of the window ledge to get a close cut. There is a tool for that called a contour gauge, but we didn’t want to have to purchase one for this project.
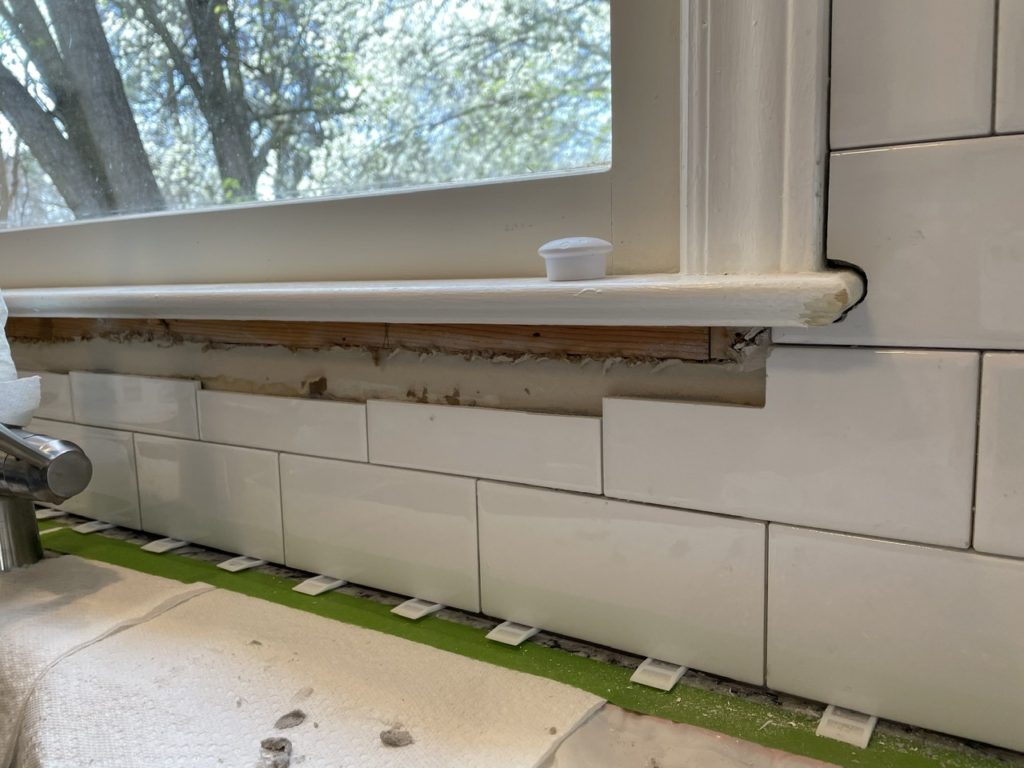
We decided to tile up and around the window to the ceiling while carrying the pattern up through. We knew this would make the cuts more challenging but we wanted it to look right.

Cleaning Up
Once the tiles had set for 24 hours, we took a razor blade knife and cut out any mortar that had seeped between the tiles to make sure there was room for the grout everywhere. This would’ve been much easier to do when the mortars is still wet, but sometimes you miss things!
Grouting
The only grouting my husband had previously done was for our guest bathroom tile floor. The tiles were 12×24 and therefore didn’t require much grout. We knew this project would be different and we’d need more and also more time. We watched a few different YouTube videos about grouting which were helpful. The grout we used was Mapei in warm gray. It was easy to mix and use. This grout has less workable time than other options so we had two of us grouting. We purchased this smaller grout float for the areas between the cabinets and the window.
If you use a Custom edge or Schluter edge trim piece, you can grout between the tile and the edge of the trim.
I have to say, we were freaking out a little after applying the grout. We just didn’t know if it was going to turn out ok. We waited about 15 minutes from the time we started and wiping down with a damp sponge. Immediately after wiping we could tell things were going to be just fine. It turned out great!
Just keep wiping with a damp sponge until most of the haze is gone. We waited an additional half an hour to buff out any of the haze that was left over with a dry cloth. Follow the directions on the grout container and you’ll be fine. We needed two containers for our 25sqft. It’s better to have it on hand than realize you need more halfway through. You can always return it!
Caulking
Once the grout had set we removed all of the spacers between the tile and the counter cleaned the area and applied grout-colored caulk all the way across. We used white caulk for between the window, cabinets, ceiling and walls. Use a wet finger to smooth out your caulk bead.

Plan for Extra Time
Unless you’ve done a lot of tiling projects in the past, plan for extra time. We have little kids at home and so most of this work happened during the weekend while I helped with the kids, and during weeknights. There were a lot of skinny little pieces my husband needed to cut for underneath the cabinets and around the window which added extra time because sometimes they would break while cutting.
We also tend to be perfectionists when it comes to projects and we want things to look just right. But this project definitely took about 4 days longer than we anticipated.
We are super happy with the end results of our backsplash!